
 English (United Kingdom)
  Italiano (Italia)
Indice
- CATIS High Cistern: Everything You Need to Know Before You Get Stuck In
- When to Read This Article: Common CATIS High Cistern Fault Symptoms
- The CATIS High Cistern: Three Main Components
- A) The Flush Siphon: How the Siphon Effect Works
- B) The Trigger Valve: How the Flush is Activated
- The Button Released: Why the Flush Carries On by Itself
- How the Flush Stops: the End of the Siphon Effect
- C) The Float Valve (Ballcock): How the Cistern Refills
- How the Ballcock Opens and Closes the Valve: the Lever Principle
- When the Valve Opens: the Float Ball Drops with the Water Level
- The Rubber Refill Tube: What It Does and Why You Mustn't Forget It
- Frequently Asked Questions About CATIS High Cisterns
- Conclusions and Acknowledgements
CATIS High Cistern: Everything You Need to Know Before You Get Stuck In
Have you ever wondered what actually happens inside your toilet cistern every time you press the flush button? The CATIS high cistern is one of the most widespread and long-lasting flush mechanisms found in Italian homes manufactured by the Italian company of the same name for over sixty years, yet very few people know how it actually works.
Understanding how the three internal components work, the flush siphon, the trigger valve and the float valve (ballcock) — isn't just a matter of technical curiosity: it's the essential foundation for diagnosing a fault, working out what needs repairing or replacing, and in most cases sorting it out yourself without calling a plumber.
In this article I'll walk you through how each component works, with step-by-step illustrations that make the mechanism easy to understand even if you've never had a look inside a toilet cistern in your life.
When to Read This Article: Common CATIS High Cistern Fault Symptoms
Understanding how a CATIS high cistern works is useful at any time, but it becomes essential when something stops working properly. Here are the most common symptoms that point to a problem with the internal mechanism:
- Water continuously trickling into the toilet bowl — you can hear a constant trickle of water running into the pan even when you haven't flushed. The most common causes are a worn flush siphon washer or a faulty float valve.
- Loud foghorn-like noise during refilling — a noise that sounds like a ship's horn, repeating every time the cistern refills. This is almost always a sign that the float valve needs replacing.
- Flush button stuck or not triggering the flush — the button stays pressed down after flushing, or does nothing at all when pushed. In this case the problem lies with the trigger valve or the flush button mechanism.
If any of these symptoms sound familiar, I've published two dedicated step-by-step guides to help you diagnose and fix the problem:
- CATIS High Cistern Leaking into the Toilet: How to Diagnose and Fix It Yourself
- How to Fix a CATIS High Cistern Flush Button That's Stuck or Won't Flush
The CATIS High Cistern: Three Main Components
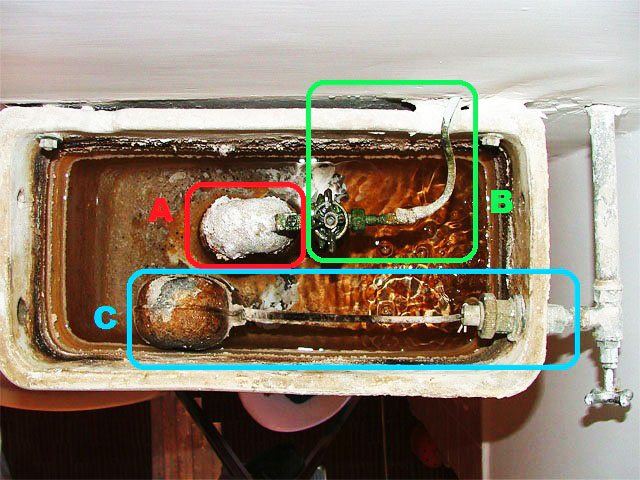
The high cistern flush mechanism — technically known as a "siphon flush" — is commonly referred to as "CATIS" after the Italian company that invented it and has been manufacturing it for over sixty years. Despite looking rather complex at first glance, the whole system is based on just three main components that work together in sequence.
If you climb up and look down into the cistern from above, as shown in the photo, you can clearly identify all three:
- A) The Flush Siphon (highlighted in red) — the heart of the mechanism, the component that releases the water down into the toilet bowl
- B) The Trigger Valve (highlighted in green) — the component that activates the flushing process when you press the button
- C) The Float Valve / Ballcock (highlighted in blue) — the component that refills the cistern after every flush
In the following sections we'll look at each of these three components in detail and explain exactly how they work.
A) The Flush Siphon: How the Siphon Effect Works
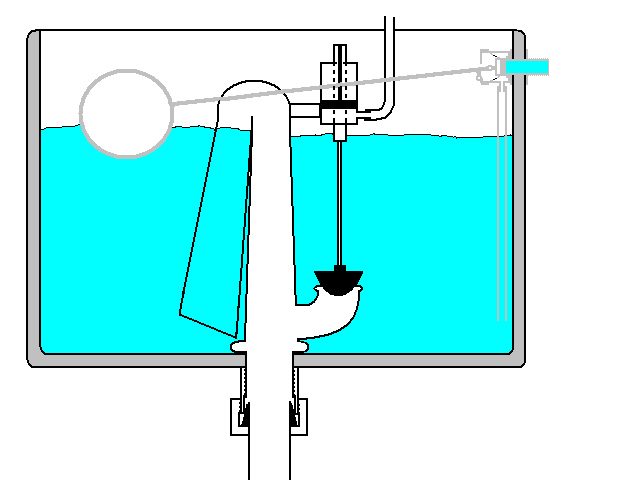
The term "siphon" refers to an inverted U-shaped tube used to transfer liquid from one container to another at a lower level. The operating principle is elegantly simple: when the tube is completely full, the liquid in the longer section tends to flow downwards under its own weight, dragging along the liquid in the shorter section which, being lighter, gets literally sucked upwards and then down.
The force driving this effect depends directly on the difference in height between the two containers: the greater the height difference, the stronger the suction and the faster the water flows through the tube. In the case of the CATIS high cistern, this height difference is particularly significant — the cistern is mounted high up on the wall — which is precisely what guarantees a powerful and complete flush every single time.
B) The Trigger Valve: How the Flush is Activated
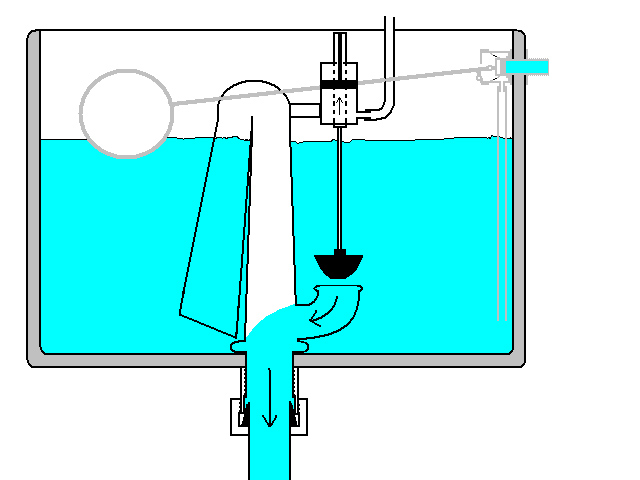
The siphon effect described in the previous section can only kick in once the tube is completely full of water. This is where the trigger valve comes into play: when you press the flush button, the compressed air in the small metal tube connected to the plunger pushes down the hemispherical rubber seal of the trigger valve, opening the passage and instantly filling the lower section of the tube — triggering the siphon effect and starting the flush.
The Button Released: Why the Flush Carries On by Itself
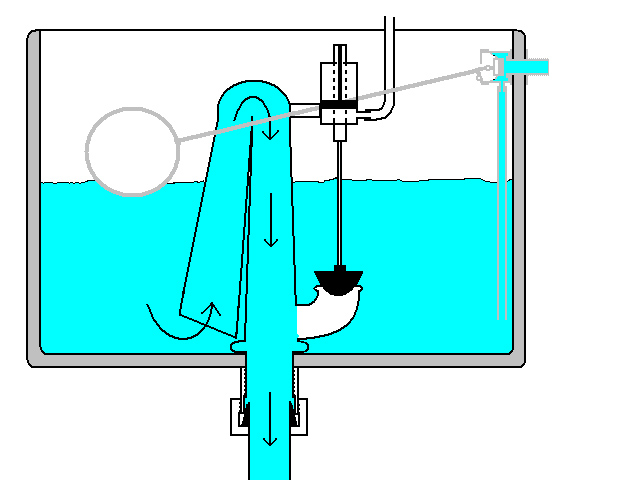
Once you release the flush button, the rubber seal of the trigger valve drops back into its seat, closing the passage. But by this point the lower section of the tube is already full of water: the siphon effect is well underway and will continue on its own, drawing water out of the cistern without any need to keep the button pressed.
How the Flush Stops: the End of the Siphon Effect
The siphon effect comes to an end when the water level in the cistern drops below the inlet opening of the siphon, allowing air to enter the tube and breaking the flow. In the case of the CATIS high cistern, where the cistern and the toilet bowl are at very different heights, this happens when the cistern is virtually empty — guaranteeing a thorough and effective flush every time.
C) The Float Valve (Ballcock): How the Cistern Refills
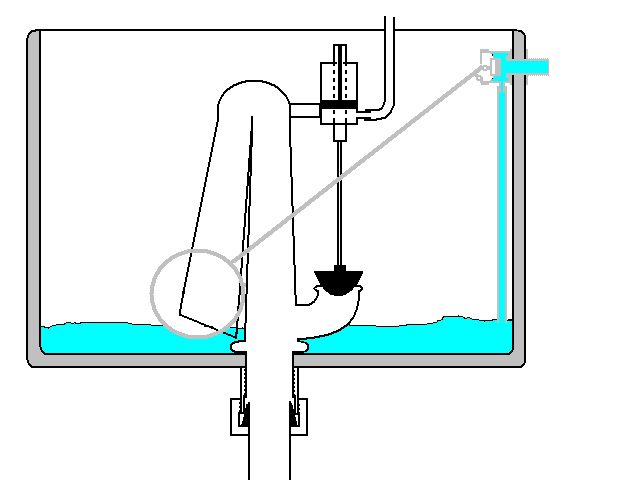
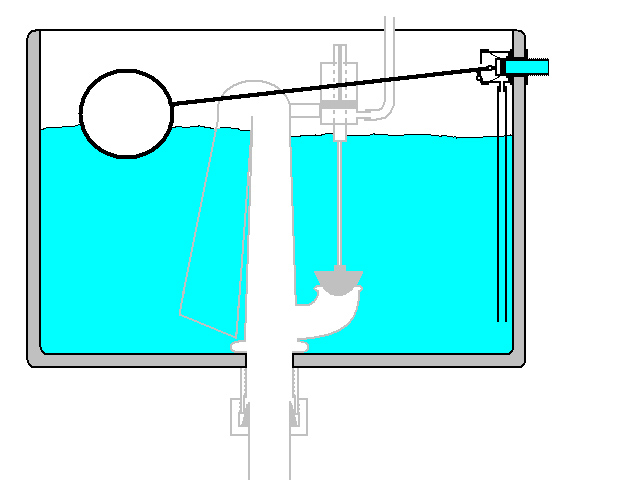
Refilling the cistern after every flush is handled by the float valve — commonly known simply as the "ballcock". This is a valve fitted with a hollow plastic ball that floats on the surface of the water: as the water level rises to the preset level, the ball floats up high enough to automatically shut off the water supply.
How the Ballcock Opens and Closes the Valve: the Lever Principle
The mechanism is based on a beautifully simple principle: the float ball is connected via a metal arm to a rubber washer that seals the water inlet. The arm acts as a lever with its pivot point positioned very close to the washer — this allows the relatively light weight of the floating ball to exert a surprisingly powerful closing force on the inlet.

When the Valve Opens: the Float Ball Drops with the Water Level
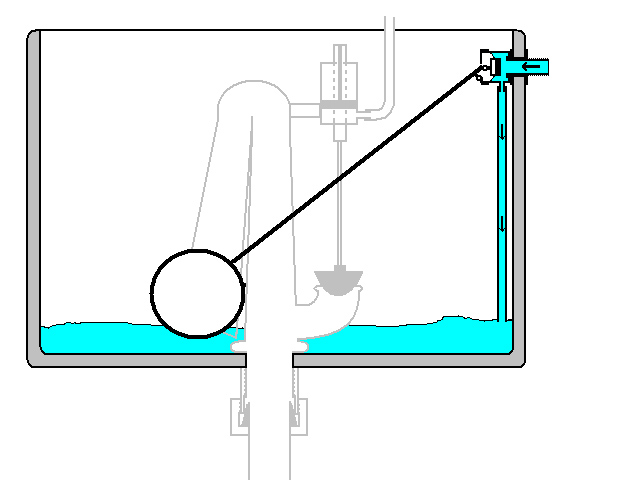
As long as the water level stays at the preset level, the valve remains closed and no water enters the cistern. The moment the flush is triggered, the water level in the cistern begins to drop, the float ball drops with it, the arm tilts downwards and the valve opens — letting fresh water in to begin the refilling process.

The Rubber Refill Tube: What It Does and Why You Mustn't Forget It
The float valve comes fitted with a small rubber tube that directs the incoming water straight down to the bottom of the cistern. This tube serves two important functions: it reduces noise during refilling — eliminating the annoying gurgling sound of water splashing down from above — and it prevents water from splashing upwards and over the edges of the cistern.
One detail worth bearing in mind if you buy a replacement float valve: the tube is usually supplied already threaded onto the metal arm. Before fitting the new valve, you'll need to unscrew the float ball from the arm, slide the tube off, fit it onto the outlet nozzle and screw the float ball back on — otherwise you'll end up with water spraying everywhere every time you flush.
Frequently Asked Questions About CATIS High Cisterns
- Why is it called CATIS? CATIS is the name of the Italian company that invented and patented this type of siphon flush mechanism, manufacturing it for over sixty years. Over time the manufacturer's name became synonymous with the product itself — much like other brand names that have gradually entered everyday language as common nouns.
- Why does a CATIS high cistern flush better than modern toilets? The siphon principle delivers a powerful and complete flush regardless of the mains water pressure, unlike modern valve-based mechanisms which depend on the available pressure to work effectively. This is precisely why the CATIS high cistern is still highly regarded and widely found in Italian homes.
- How long does a CATIS high cistern last? With minimal maintenance — periodic replacement of the flush washer and occasional lubrication of the flush button — a CATIS high cistern can last for decades. It's not unusual to find perfectly functioning units that were installed back in the 1960s and 70s.
- Can you replace just the trigger valve washer without replacing the whole siphon? Yes, the hemispherical rubber seal of the trigger valve is available as a separate spare part and costs just a couple of pounds. However, if the siphon unit is very old or showing other signs of wear, it's worth considering a full replacement while you're at it.
- Are spare parts for CATIS high cisterns still available? Yes, CATIS still manufactures all replacement parts today, available from plumbing supply shops and online retailers. The full spare parts catalogue can be found on the official website at www.catis.it.
Conclusions and Acknowledgements
And there we have it — I hope this guide has given you a clear and complete picture of what actually goes on inside your CATIS high cistern every time you press the flush button. Understanding how the three internal components work — the flush siphon, the trigger valve and the float valve — is the essential first step towards tackling any maintenance or repair job with confidence.
If reading this guide has helped you identify a problem with your cistern, I've published two dedicated step-by-step repair guides that will walk you through the fix:
If your cistern is continuously leaking water into the toilet bowl: CATIS High Cistern Leaking into the Toilet: How to Diagnose and Fix It Yourself
If the flush button is stuck, stays pressed down, or won't trigger the flush: How to Fix a CATIS High Cistern Flush Button That's Stuck or Won't Flush
If you've found this guide useful and would like to explore more DIY plumbing repairs around the home, feel free to browse the other articles in the Plumbing section of the site, where you'll find plenty more practical guides and step-by-step tutorials.
I care a great deal about the quality and originality of everything I publish, so I'd rather my content wasn't copied or republished elsewhere. That said, if you think this guide could be useful to other people, I'd be really chuffed if you shared the link to this page — it's the best way to spread the word and support the work that goes into every article.
Happy DIY Repairing, Everyone!
Luciano (Capitan Farloc)