
 English (United Kingdom)
  Italiano (Italia)
 Indice
Protection, Style and Craftsmanship in Front of the Fireplace
If you’ve got a fireplace at home, you’ll know that when it’s not in use, it can let in unwanted smells and dust. In this article, I’ll show you how to build a custom chestnut wood door elegant, practical and made to measure to fit neatly over the fireplace opening. It’s a small project that improves indoor air quality, enhances your living space, and adds a touch of genuine craftsmanship.
Materials Used
- Rough‑sawn chestnut boards (3 cm thick, 2 m long)
- PVA wood glue
- Biscuits/lamellos for edge‑to‑edge joints
- Wood stain (Dark Walnut + Teak, or other mixes depending on the desired tone)
- Grain filler/sealer
- Clear protective finish
Tools Required
- Mitre saw for cutting the boards
- Bandsaw for reducing width and thickness
- Router table or handheld router
- 45° chamfer bit
- Biscuit joiner
- Long clamps for pressing the panels
- Steel box‑section profiles to keep the panel flat
- Random‑orbit sander
Difficulty, Time & Cost
- Difficulty Level: Intermediate
- Estimated Time: 1–2 days
- Estimated Cost: 25–35 euros
Introduction
Hi everyone,
In a mountain house I’ve got a beautiful old-style fireplace—no fancy extras, just solid and fully functional. But it does have one small issue.
Basically, when it’s not in use and the wind picks up outside (and trust me, up in the Cimini Mountains the wind can really blow), air sometimes gets drawn down the chimney, bringing with it soot and—more noticeably—that lingering smoky smell.
So when you come back after being away for a while, you’re greeted by that unmistakable whiff of smoke and soot.
Here’s the fireplace I’m talking about:

A Wooden Door to Fix the Problem
To sort things out, I noticed that some of the neighbours had a carpenter build them a wooden door to seal off the fireplace opening. So (naturally!) I thought—why not make one myself? I went for chestnut wood, and… here’s how it turned out:

How the Build Started
Let’s start from the beginning...
Chestnut wood is pretty common around here, which makes it quite affordable compared to other fancy hardwoods. So I headed to a local sawmill and picked up two rough-cut chestnut boards (yep, I wanted to do the full job myself). They cost me €7 each—just €14 in total.
Now, I’ll admit, they didn’t look like much at first glance, but for that price I really couldn’t complain. Each board is 2 metres long and, more importantly, a chunky 3 cm thick—plenty of material to work with.

Cutting the Boards with a Mitre Saw
The door needed to measure 57 x 84 cm, and after chatting it over with my other half, we agreed it would look nicer made from vertical slats—lined up side by side and glued together. So I got started with the mitre saw, cutting the boards into 57 cm lengths to make the vertical planks.

Trimming the Slats with a Bandsaw
The boards were obviously too wide as they were, so—since each one was 13 cm across—I cut them in half using the bandsaw.

Then I set the bandsaw fence 6 cm from the blade to trim all the slats to the same width.

With the bandsaw set up like that, I trimmed each slat—killing two birds with one stone: not only did I get them all to exactly the same width, but I also removed the rough, unfinished edge from each piece.

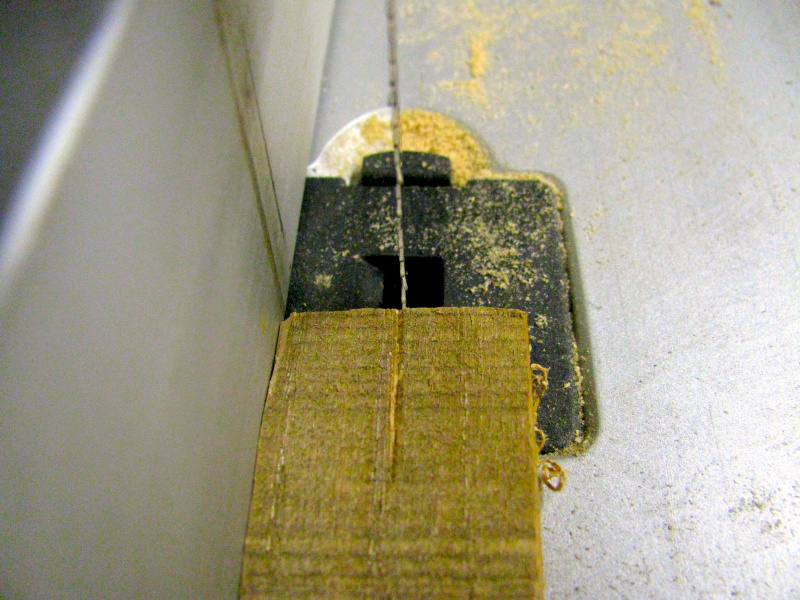
Reducing the Thickness to 14 mm
So at this point I had seven slats, each 6 cm wide and 57 cm tall.
But the original 3 cm thickness was far too chunky—if I’d built the door like that, it would’ve ended up way too heavy (not to mention, two boards wouldn’t have been nearly enough).
So I grabbed the calliper and measured halfway along the edge of each slat, marking the centre line to guide the thickness reduction.

So I adjusted the bandsaw fence to line the blade up with the exact centre of each slat. That way, I was able to slice them down the middle, halving the thickness and bringing each one to around 14 mm.
That gave me 14 slats, each 6 cm wide and 57 cm tall. When placed side by side, they add up to a total width of 84 cm—which, together with the 57 cm height, is exactly the size I needed for my fireplace door.

Dry Fit to Check the Grain Pattern
Throughout the process, I kept the slats in the same order as I cut them, carefully aligned along the original cuts. Once all the trimming was done, I laid them out again and numbered each one. This way, when assembling the final door, I could keep the boards as close as possible to their original neighbours—preserving the natural flow of the wood grain across each joint.

So I laid the slats out on the floor, side by side, following the numbering I’d marked earlier, just to get a good visual of how the grain patterns lined up. And… I have to say, it looked pretty satisfying

Chamfering the Edges with the Router
Now, using a 45-degree bit mounted on the router table, I chamfered the edges of each slat. This gives a nicer look where the boards meet—and, just as importantly, helps to hide the small imperfections caused by the bandsaw’s slightly uneven cuts.

For this step, as I mentioned, I used a router table fitted with a simple 45-degree bit. But you can achieve the same result using a handheld plunge router or a laminate trimmer with a moulding bit and a guide bearing.
If you're interested in learning more about this topic, there's a great article by our friend Mariobrossh that covers the basics of using a plunge router—definitely worth a read.
You can find the article at this link: Basic Guide to Using a Handheld Vertical Router (by Mariobrossh)
No matter how you go about trimming the edges, the final look of the door is definitely more pleasing to the eye.

Edge Joining with Biscuits
To join the slats together, I used the biscuit joiner. I have to say, when it comes to edge-to-edge wood joints, biscuit joining strikes a great balance between speed and the quality of the final result.
There are other solid alternatives too:
-
Using beech dowels: This method requires very little equipment and is quite budget-friendly. However, it’s slower and a bit trickier, as the margin for error is much smaller. If you're curious, there's a detailed article by Mariobrossh on this topic: Building Furniture Using Beech Dowels or Doweling (by Mariobrossh)
-
Tongue and groove (or mortise and tenon) joints: This system is faster and more precise, but you’ll need a router table and specific bits designed for this type of joint—which can bump up the cost of your setup. One downside is that this method eats into the width of your boards, so you’ll need wider slats to compensate for the material lost in the joint

As I was saying, this tool—whose price is quite reasonable among hobby-grade brands—lets you quickly cut all the biscuit slots along the edges of the wooden slats, like this:

Gluing with PVA Wood Glue
At this point, I used trusty PVA wood glue to bond the slats together.
Personally, I like to be generous with the glue, especially in the slots and on the biscuits, because they tend to absorb some of the moisture from the PVA. This causes them to swell slightly, which helps create a stronger and more secure joint
.

Drying and Clamping the Panels
Since there were quite a few slats, I glued seven at a time, creating two halves of the door. Once those had dried, I glued the two halves together.
To prevent the panel from warping under clamp pressure, I used square-section iron tubing—two underneath and two on top—held in place with clamps to keep everything flat. Then, of course, I added long clamps across the joints to hold the slats tightly together. I left the whole setup overnight to allow the PVA glue to fully cure
.

Smoothing the Wood with a Random Orbital Sander
Since I didn’t have access to a planer, I positioned the bandsawn faces at the front of the door, leaving the rougher sides at the back—where they wouldn’t be visible or cause any issues.
Of course, the bandsaw leaves the surface quite rough, with some inevitable imperfections. So I spent a bit more time working with the random orbital sander, starting with coarse grit and gradually moving to finer grits for a smoother finish

Wood Treatment and Finishing
Once I’d finished sanding, I applied the wood stain with a brush, then wiped it down with a cloth to help spread the colour more evenly.
To find the right shade, I ran a few tests on a scrap piece—mixing Dark Walnut stain (for the brown tone) with Teak stain to warm it up a bit, aiming for a slightly reddish hue. I was actually advised to use Cherry for that effect, but in the end I diluted the mix with an equal amount of water to lighten the colour, which otherwise came out too dark
.

After that, I applied a coat of sanding sealer, gave it a light sanding, and then finished it off following the method taught by the “maestro” Mariobrossh in his projects—which you can find published here on the site.
The result is what you can see in this photo
.
Sure, the fact that I didn’t plane the slats left a few marks here and there, giving the piece a more rustic feel—but in the end, I’m genuinely pleased with how it turned out. What do you think?
As always, I hope this article proves useful—whether as a step-by-step guide or simply as inspiration for someone’s own projects.
Thanks to everyone who read through to the end. Your interest shows that this work wasn’t in vain.
If you enjoy woodworking and handmade projects, you’ll find more builds in the Carpentry section of the site
Thanks
Luciano (Capitan Farloc)