
 English (United Kingdom)
  Italiano (Italia)
Indice
- Washing Machine Drain Pump: How It Works, Faults and Solutions
- How the Washing Machine Drain Pump Works
- Where the Drain Pump Is Located and How to Remove It
- The Drain Pump Up Close: Main Components
- The Pump Filter: How to Access It and How to Remove It
- The Pump Filter: What It Looks Like, When to Clean It and How
- The Pump Is Running but Draining Slowly: Causes and Diagnosis
- The Pump Won't Run: Causes and Diagnosis
- Frequently Asked Questions About the Washing Machine Drain Pump (FAQ)
- Conclusions and Acknowledgements
Washing Machine Drain Pump: How It Works, Faults and Solutions
Is your washing machine not draining and stopping with an error message? Are your clothes still wet after the spin cycle? Or perhaps the spin cycle is running but seems less powerful than usual? In all these cases the first component to check is the drain pump — the heart of the washing machine's water removal system.
In this guide we'll look at how a centrifugal drain pump works, where it's located inside the machine and how to remove it, how to clean the filter and when to do it, and above all how to diagnose the most common faults: from a blocked impeller to a burnt-out motor, taking in worn bearings and a clogged filter along the way. Everything you need to identify the source of the problem and, in most cases, fix it yourself without calling out a repair technician.
How the Washing Machine Drain Pump Works
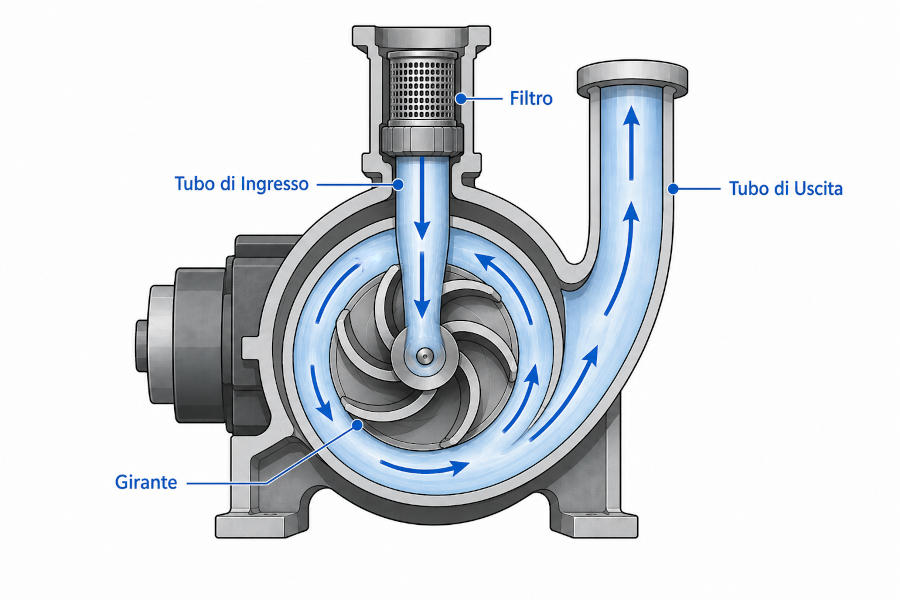
The washing machine drain pump is of the centrifugal type — the same principle used in water pumps, central heating circulation pumps and many other domestic and industrial applications. Its operation is straightforward and intuitive, and the diagram alongside makes it immediately easy to understand.
The heart of the pump is the impeller: a small wheel with straight or curved blades that spins at high speed inside a circular chamber. When the motor sets it in motion, the impeller draws in the water entering through the inlet pipe and sends it spinning rapidly. At this point physics takes over: centrifugal force — the same force that pushes you towards the car door when you go round a bend — pushes the water outwards towards the edge of the chamber, where it is collected and forced through the outlet pipe towards the drain hose.
Before reaching the impeller, the water passes through a filter whose job is to catch any foreign objects — coins, buttons, fabric debris and the like — that could block or damage the impeller.
The result is a steady, powerful flow of water that empties the drum in just a few minutes, ready for the next phase of the wash cycle.
Where the Drain Pump Is Located and How to Remove It
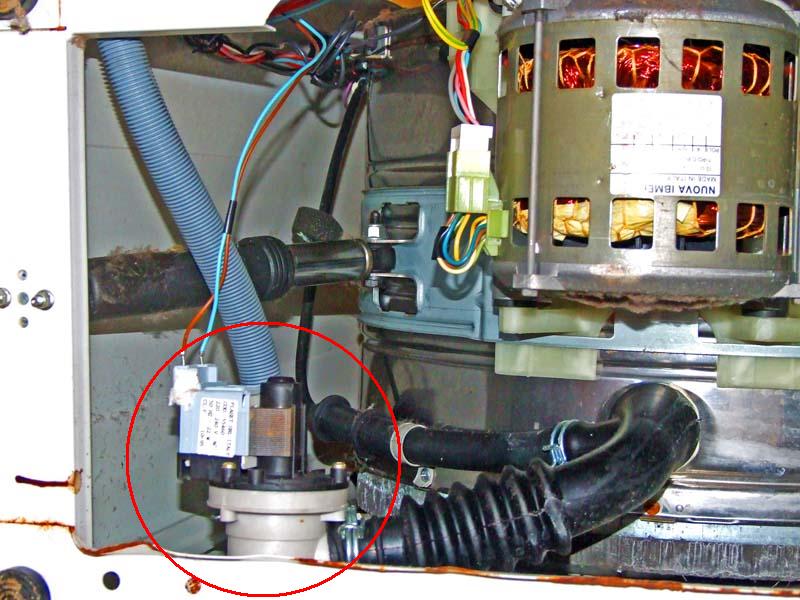
The drain pump is positioned at the bottom of the washing machine, facing the front panel — a deliberate design choice that allows easy access to the filter from outside without having to disassemble anything. In the photo, taken with the machine tilted forwards to show the underside, the pump is clearly identified by the red circle.
To remove it, follow these steps:
- Unplug the machine from the mains — this is the golden rule for working safely on any appliance
- Turn off the water supply tap and disconnect the inlet hose — the second rule that helps you stay dry
- Remove the pump filter to drain the water — there's always some water left inside the pump; it's worth letting as much out as possible before removing it
- Tilt the machine to one side — this is a delicate operation; it's a good idea to lay a blanket or an old towel on the floor first to avoid scratching the paintwork
- Disconnect the power connectors — these are attached to the pump motor via two spade connectors (faston) or a dedicated multi-pin connector
- Detach the hoses — the inlet and outlet hoses are secured with spring-loaded hose clips: to remove them simply squeeze the clip with a pair of pliers, slide it along the hose and pull the hose off the fitting
- Unscrew the mounting screws — the pump is secured with two or three screws to a metal bracket or directly to the outer casing of the machine
⚠️ Warning: before detaching the hoses, make sure you have a cloth or a bowl to hand — there may still be water residue in the pipes.
The Drain Pump Up Close: Main Components
-
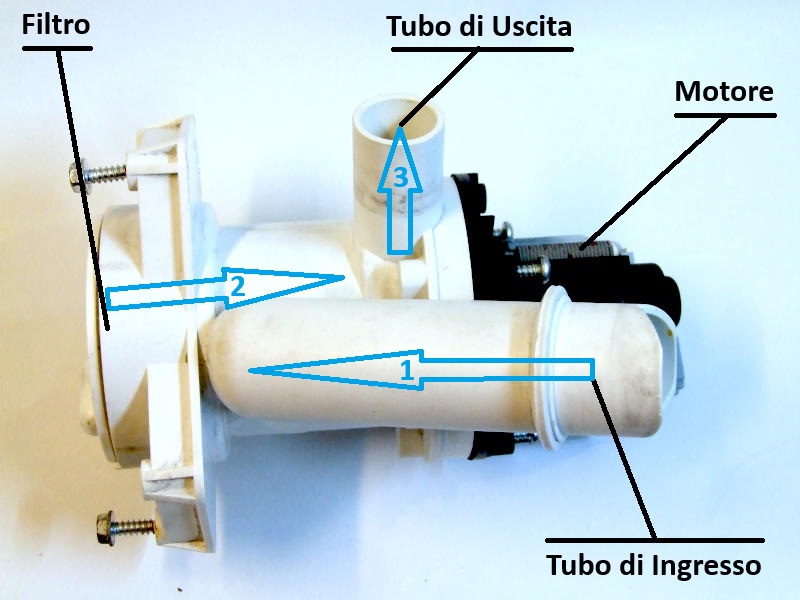
This photo shows a drain pump removed from the machine with its main components clearly labelled. The blue arrows indicate the path the water takes through the pump:
- Inlet pipe: the water coming from the drum enters the pump here and heads towards the filter.
- Filter: before reaching the impeller, the water passes through the filter which catches any foreign objects — coins, buttons, hair or fabric debris — that could block the flow, damage the impeller blades or jam the impeller completely.
- Outlet pipe: once the impeller has set the water spinning and centrifugal force has pushed it outwards, it is channelled upwards through the outlet pipe and from there through to the drain hose of the washing machine.
- Motor: visible on the right-hand side of the photo, this is what drives the impeller. It's a small, robust AC electric motor designed to operate in a damp environment.
The Pump Filter: How to Access It and How to Remove It
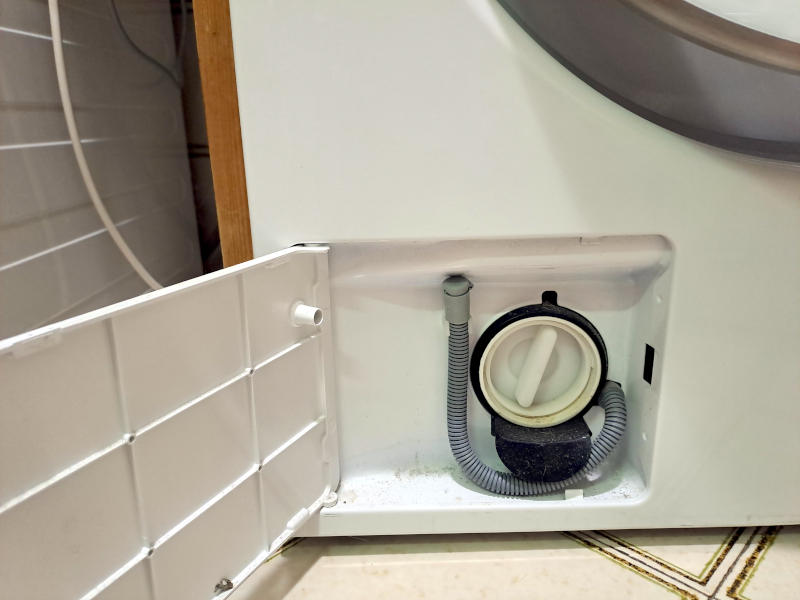
The drain pump filter is accessible from outside the washing machine, hidden behind a small plastic access panel at the bottom of the front fascia — exactly as shown in the photo. Simply open the panel to find the filter cap, ready to be unscrewed and cleaned without having to disassemble anything.
Before opening the cap though, it's worth being prepared: there's almost always some residual water inside the pump that will spill out as soon as the cap is loosened. Keep a shallow bowl and some cloths to hand to catch the water.
Because the filter cap is quite large, opening it directly can release the water rather forcefully. For this reason many modern washing machines, like the one shown in the photo, are fitted with a small flexible drain hose with a stopper positioned next to the filter: by unscrewing this stopper you can drain the residual water from the pump slowly and in a controlled way before removing the filter itself. A small precaution that saves you an unnecessary flood on the floor!
To remove the filter, simply turn the cap anticlockwise (counterclockwise) and it will slide straight out.
The Pump Filter: What It Looks Like, When to Clean It and How
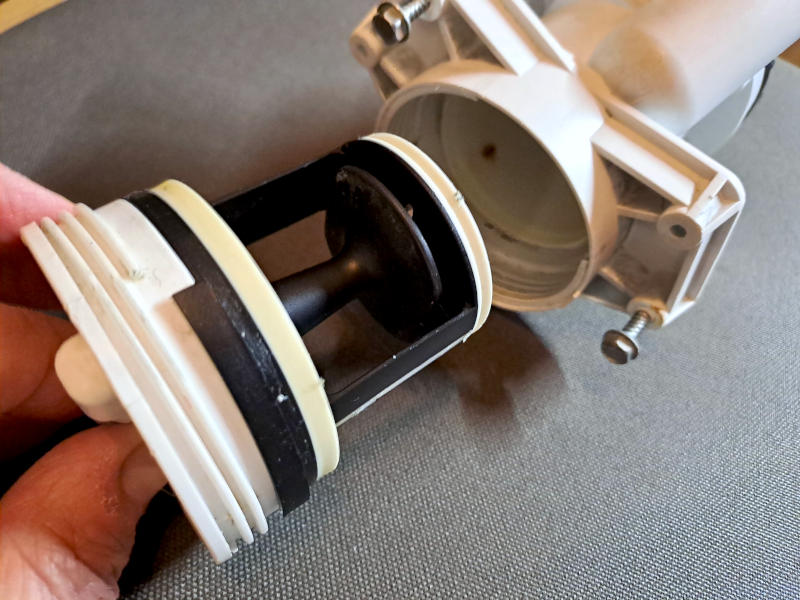
The photo shows the filter removed from its housing. Compared to the filters found in older washing machines — which had a much finer mesh and clogged up very frequently — modern filters have a coarser mesh that only catches larger objects, with the advantage that they need cleaning far less often.
When they do clog up though, the consequences are not to be taken lightly. Here are the most common symptoms that should make you suspect a blocked filter — and since it's such a quick and simple check, it's always worth doing before anything else:
1) Drain error code — Modern washing machines detect when the pump isn't clearing the water within the allotted time and stop, displaying an error code on the panel.
2) Slow or ineffective spin cycle — If too much water has been left in the drum because the pump couldn't clear it completely, the motor struggles to accelerate the drum up to spin speed. In this mode the motor runs fast but with reduced torque, and the weight of the residual water can prevent it from reaching the required RPM.
3) Clothes coming out still wet — If the water isn't drained properly, the spin cycle can't wring the laundry effectively and the clothes come out of the washer still damp or even soaking wet.
How to clean the filter: In most cases a toothpick or a small screwdriver is all you need to remove the fabric residue, hair and fluff trapped in the mesh. If there are limescale deposits, the most effective remedy is to soak the filter in kitchen vinegar for a few hours until the limescale has fully dissolved, then rinse it thoroughly before refitting.
The Pump Is Running but Draining Slowly: Causes and Diagnosis
The symptoms of this fault are identical to those of a blocked filter — slow spin, wet clothes, drain error — but they persist even after the filter has been thoroughly cleaned. This is the signal that the problem lies elsewhere.
How to confirm the fault: The test is simple: place the washing machine's drain hose inside a bucket positioned at least one metre above the floor, then run a programme with a drain phase and watch the flow of water coming out. If the flow is weak or intermittent, the pump isn't working as it should.
The three most likely causes are:
1) Blockage downstream of the pump — The problem may not be in the pump itself but in the drain hose or the wall outlet fitting: an object lodged in that section can significantly reduce the flow without the pump being at fault. It's always worth checking this first before removing the pump.
2) Broken impeller blades — If one or more of the impeller blades have snapped off, the flow rate drops dramatically and the pump can no longer push the water with the necessary force. To check, simply remove the filter and look inside the housing: you can see the impeller at the back and check visually whether the blades are intact.
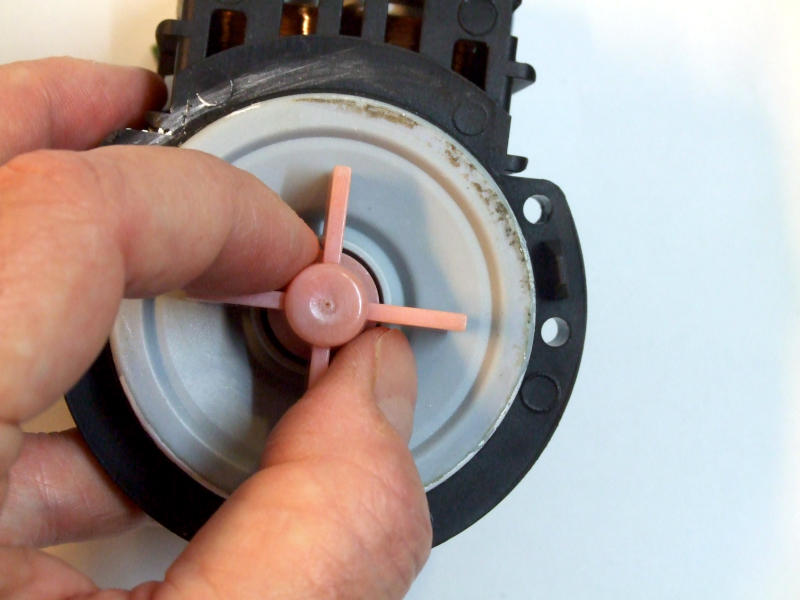
3) Worn motor shaft bearing — The bearing (also known as a bushing or sleeve bearing) is a small sliding component that supports the motor shaft. When it wears out, the shaft starts to vibrate during rotation, slowing the impeller and reducing its flow rate. To check, remove the filter, grip the impeller between two fingers (as shown in the photo) and try to move it sideways: if you notice even the slightest lateral movement, the bearing is worn and the pump needs to be replaced.
The Pump Won't Run: Causes and Diagnosis
This is the most serious fault: doing the bucket test yields no water at all, and you can't hear the characteristic sound of the impeller running. The machine stops during the drain phase and displays an error code.
The three most common causes, in order of likelihood and ease of diagnosis, are:
1) Jammed impeller — Remove the filter and try turning the impeller blades with your fingers: if it won't turn or feels very stiff, something is blocking it. The most common cause is a thread of fabric, a hair or some other object that has worked its way under the impeller and wrapped itself around the motor shaft. In some cases it may be a seized bearing. Before replacing the pump it's always worth searching for and removing the obstruction — in many cases that's all it takes to solve the problem.
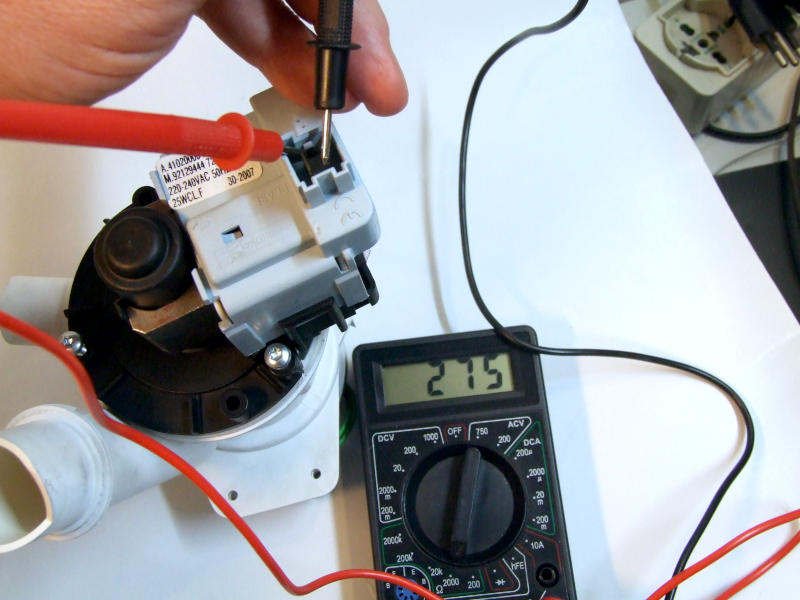
2) Burnt-out motor winding — If the impeller turns freely but the pump still won't start, the problem may be in the motor itself. To check, disconnect the power leads from the pump and measure the winding resistance with a multimeter set to resistance measurement mode, touching the probes to the two power terminals — exactly as shown in the photo. If the multimeter shows infinite resistance ("1" on the display of digital multimeters), the winding is broken or burnt out and the pump needs to be replaced.
⚠️ Warning: make sure the power leads are disconnected from the pump before taking the measurement, otherwise the reading will be inaccurate.
3) No power reaching the pump — If the impeller turns freely and the winding tests fine but the pump still won't run, the problem is likely upstream: the control unit isn't sending the start signal to the pump. In this case the diagnosis and repair require more specialist knowledge and it's advisable to call in a qualified technician.
Frequently Asked Questions About the Washing Machine Drain Pump (FAQ)
My washing machine isn't draining and is showing an error — is it definitely the pump? Not necessarily. Before working on the pump it's worth checking a few simpler things first: is the drain hose kinked or crushed? Is the wall drain outlet blocked? Is the pump filter clogged? Only once you've ruled these out is it time to focus on the pump itself, following the tests described in this article.
How often should I clean the pump filter? Under normal conditions, cleaning it every 2-3 months is sufficient — or whenever the symptoms described in this article appear: drain error, slow spin, wet clothes. If you frequently wash very fluffy items or use large amounts of detergent, you may need to clean it more often.
My clothes are still wet after the spin cycle — is the pump to blame? It's one of the most likely causes. If the pump can't fully empty the drum before the spin cycle, the clothes remain waterlogged and the spin can't wring them out effectively. Before working on the pump though, check the filter first — it's often the simplest and quickest fix.
The spin cycle is running slowly — could it be the pump? Yes. If residual water has been left in the drum because the pump couldn't clear it completely, the weight of the water prevents the motor from accelerating the drum up to the spin speed required by the programme. Here too, the first thing to check is the filter.
How do I know if the impeller is broken or jammed? Remove the filter and look inside the housing: you can see the impeller at the back. If the blades are visibly broken or missing, the impeller needs to be replaced along with the pump. If the impeller looks intact but won't spin freely when you push it with a finger, there may be an obstruction around the shaft — try removing it before going ahead with a replacement.
How do I know if the pump motor has burnt out? Using a multimeter set to resistance measurement mode, measure the resistance across the two power terminals of the pump (with the leads disconnected). A finite resistance reading — in the order of hundreds of Ohms — indicates the motor is intact. If the display shows infinite resistance, the winding has burnt out and the pump needs to be replaced.
Is it worth trying to repair the pump or should I just replace it? In almost all cases, replacement is the most practical choice. Replacement drain pumps are relatively inexpensive and easy to find, both from specialist appliance parts suppliers and online. The only exception is when the problem is simply an obstruction around the impeller or a clogged filter — in that case cleaning is all that's needed and no replacement is necessary.
Conclusions and Acknowledgements
And here we are at the end of this guide: I hope that the explanation of how the drain pump works has given you a clear picture of this essential component, and that the tips on the most common faults will come in handy the next time your washing machine won't drain, the spin cycle runs slowly or your clothes come out still wet.
If after reading this guide you still have questions about how the washing machine works as a whole and how all the various components interact during a wash cycle, you'll find a complete explanation in the dedicated article: How Does a Washing Machine Work: Components, Diagram and Cycle Explained
If on the other hand the problem with your washing machine involves other components, you might also find these articles useful:
- Washing Machine Door Lock and Interlock: How It Works, Diagnosis and Repair
- Washing Machine Inlet Valve: How It Works, How to Test It and How to Replace It
- Washing Machine Pressure Switch: How It Works, How to Test It and How to Replace It
If you've found this guide useful and would like to explore other home appliance repairs, you can carry on reading by visiting the other content in the Home Appliances section of the site, where you'll find many more practical guides and step-by-step explanations.
I care deeply about the quality and originality of the content I publish, and for this reason I'd prefer it not to be copied or republished elsewhere. If however you think this guide could be useful to others, I'd be really glad if you'd share the link to the page, it's the most straightforward way to spread the information and support the work that goes into every article.
Happy DIY Repairing, Everyone!
Luciano (Capitan Farloc)